Sunday, November 26, 2006

Software Estimation Tips

These tips are taken from Software Estimation – Demystifying the Black Art by Steve McConnell, published in the Microsoft Best Practices series.  This book has proved to be an invaluable resource and I recommend it to anyone responsible for providing software estimates, be they developer, team lead or project manager.  The tips listed are not exhaustive and should be considered in their original context.

Critical Estimation Concepts

  1. When you’re asked to provide an estimate, determine whether you’re supposed to be estimating or figuring out how to hit a target.
  2. A target is a description of a desirable business objective; a commitment is a promise to deliver defined functionality at a specific level of quality by a certain date. A commitment can be the same as the estimate, or it can be more aggressive or more conservative but do not assume that it is the same.
  3. Avoid using single point estimations, use ranges. Avoid using artificially narrow ranges so that you do not misrepresent the confidence in your estimates.
  4. Never intentionally underestimate. The penalty for underestimation is more severe than the penalty for over estimation. Address concerns about over estimation through planning and control, not by bias.
  5. Recognize a mismatch between a project’s business target and a project’s estimate for what it is: valuable risk information that the project might not be successful. Take corrective action as early as possible.
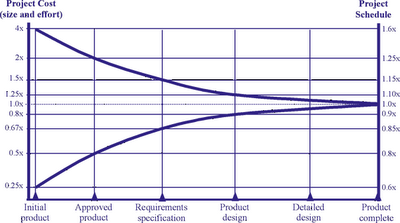
  6. Consider the effect of the Cone of Uncertainty on the accuracy of your estimate. Your estimate cannot have more accuracy than is possible at your project’s current position within the Cone. Use predefined ranges in your estimates.

    Cone of Uncertainty

  7. Include all necessary software development activities in your estimates, not just coding and testing. For example:
    i. Mentoring of new team members;
    ii. Deployment;
    iii. Requirements Clarification;
    iv. Technical Reviews;
    v. Performance Tuning;
    vi. Creation of Test Data.
  8. On projects that last longer than a few weeks, always include allowances for overhead activities such as vacations, sick days, training days and meetings.
  9. Never give an off-the-cuff estimate. Even a 15 minute estimate will be more accurate.
  10. Always document assumptions embedded in an estimate.
  11. Match the number of significant digits in your estimate (its precision) to your estimate’s accuracy. For example:
    i. “This Project will take 1 year” is not very precise but could be accurate.
    ii. “This Project will require 7,214 staff hours” is very precise but not accurate to the precision stated.
  12. Don’t assume that effort scales up linearly as project size does. Effort and communication paths scale up exponentially.

Fundamental Estimation Techniques

  1. Look for something you can count that is a meaningful measure of the scope of work in your environment.
  2. Collect historical data that allows you to compute an estimate from a count. Our organization’s past performance is the best indicator of future performance, industry data is not reliable.
  3. Collect a project’s historical data as soon as possible after the end of a project.
  4. At all costs, avoid using expert judgement to tweak an estimate that has been derived through computation.
  5. To create task level estimates, have the people who will actually do the work create the estimate.
  6. Create both Best Case and Worst Case estimates to stimulate the thinking about the full range of possible outcomes.
  7. Estimate new projects by comparing them to similar past projects, preferably decomposing the estimate into at least five pieces.
  8. Use T-Shirt sizing to help non technical stakeholders rule features in or out whilst the project. The first table can be used to calculate Net Business Value.

    Development Cost

    Business Value

    XL

    L

    M

    S

    XL

    0

    4

    6

    7

    L

    -4

    0

    2

    3

    M

    -6

    -2

    0

    1

    S

    -7

    -3

    -1

    0

    Feature

    Business Value

    Development Cost

    Net Business Value

    A

    XL

    M

    6

    B

    M

    M

    0

    C

    M

    S

    1

    D

    S

    L

    -3

    E

    S

    XL

    -7

  9. Have each team member estimate pieces of the project individually and then review estimates. Don’t just average estimates, arrive at a consensus that everybody is comfortable with.
  10. Use an estimation software tool to sanity check estimates created by manual methods. Do not treat the output of the tool as divine revelation. For pointers to estimation tools, see www.construx.com/estimate
  11. Focus on estimating size first. Then compute effort, schedule and cost from the size estimate.
  12. Re-estimate at each milestone. Base new estimates on the project’s actual progress, not on the project’s planned progress.
  13. Communicate your plan to re-estimate to project stakeholders in advance.

Estimation Scheduling Challenges

  1. Do not shorten a schedule estimate without increasing the effort estimate.
    i. Larger teams require more coordination and management overhead.
    ii. Larger teams introduce more communication paths which introduce more chances to miscommunication which introduces more errors.
    iii. Shorter schedules require more work to be done in parallel. The more work that overlaps, the higher than chance that one piece of work will be based on another defective piece of work increasing the need for rework.
  2. Reduce costs by lengthening the schedule and conducting the project with a smaller team.
  3. Consider the project’s development approach in allocating schedule to different activities.

Thursday, November 23, 2006

ASP.NET2.0 Page Life Cycle

Whilst investigating the ASP.NET AJAX Client Page LifeCycle in my previous post, I also revisted the server side ASP.NET Page LifeCycle.  The overview on MSDN is definitive but this splendid chart, courtesy of Leon Andrianarivony, deserves further propogation.

ASP.NET2.0 Page LifeCycle

Monday, November 20, 2006

Maintaining GridView Scroll Position in an ASP.NET AJAX UpdatePanel

Sometimes, it is inappropriate to use the paging feature of the ASP.NET GridView.  Instead, a scrolling grid is more applicable and enclosing the GridView in a <div> tag with the overflow style applied ensures that the over-sized element is clipped and that scroll bars are displayed.

<asp:UpdatePanel ID="updateGrid" runat="server" UpdateMode="Conditional">
    <ContentTemplate>
        <input type="hidden" id="hdnScrollTop" runat="server" value="0" />
        <div id="divScroll" style="width:350px;height:200px; overflow-x:hidden; overflow-y:scroll;" onscroll="$get('hdnScrollTop').value = this.scrollTop;">
            <asp:gridview id="grdOrders" runat="server" width="95%" datasourceid="objDataSource" cellpadding="3" GridLines
="Horizontal">
                <Columns
>
                    <asp:CommandField ShowSelectButton="True"
/>
                </Columns
>
            </asp:gridview>
  
        
</div
>
    </ContentTemplate
>
</
asp:UpdatePanel>

It is slightly more complex to persist the scroll position during an syschronous postback using ASP.NET AJAX.  It's necessary to store the scrollTop property of the div tag in a hidden field using the client side onscroll event.  Note the use of the Sys.UI.DomElement $get method, which is a shortcut to the getElementById method. It's also important that the hidden input element has the runat="server" attribute so the element can be accessed during the pageLoaded function.

<asp:ScriptManager ID="scriptManager" runat="server" EnablePartialRendering="True" />
<
script type="text/javascript" language
="javascript">
    var prm = Sys.WebForms.PageRequestManager.getInstance();
    prm.add_pageLoaded(pageLoaded);
    prm.add_beginRequest(beginRequest);
   
var postbackElement;

    function beginRequest(sender, args) {
        postbackElement = args.get_postBackElement();
    }

    
function
pageLoaded(sender, args) {
        
var
updatedPanels = args.get_panelsUpdated();
        
if (typeof(postbackElement) == "undefined"
) {
            
return
;
        }
        
if (postbackElement.id.toLowerCase().indexOf('grdorders'
) > -1) {
            $get("divScroll").scrollTop = $get("hdnScrollTop").value;

        }
     }
</script>

In order that the scroll position of the div can be reset after a postback, it is first necessary to add a reference to the PageRequestManager.  To use the PageRequestManager class in client script, you must first have a ScriptManager server control on the page. To access the PageRequestManager class, you must have the EnablePartialRendering set to true (the default) on the ScriptManager control. When EnablePartialRendering is set to true, the MicrosoftAjaxWebForms.js file that contains the PageRequestManager class is included as a script resource for the page.  Once you have the current instance of the PageRequestManager, you can access all of its methods, properties, and events such as beginRequest and pageLoaded.

The beginRequest event is raised before the processing of an asynchronous postback begins and the postback is sent to the server.  Here we get a reference to the element that has raised the postback. 

The pageLoaded event is raised after all content on the page is refreshed.  The function initially determines if the page has been posted back by checking the typeof the postbackElement.  If the postback was raised by a our GridView, the scrollTop property of our div tag is set to the value stored in the hidden field.

Client Page Life-cycle Events are also integral to Customizing Error Handling in Partial-Page Updates.

Thursday, November 16, 2006

ASP.NET Panel GroupingText Property

I discovered the GroupingText property of the ASP.NET2.0 Panel control today.  When the property is set, the control actually renders a <fieldset> tag to group child form elements together with a caption and a smooth cornered border. The caption itself is created using the <legend> tag.  The browser is responsible for the appearance of the caption and labels I think it looks really neat in IE7.


Tuesday, November 14, 2006

WCF Contracts Defined

A WCF service publishes the operations that it supports by using a service contract. This contract defines the operations that the service provides, without specifying how the operations should be implemented.

Operations are defined by adding methods to a Service Contract interface that is annotated with the OperationContract attribute. Only methods that are qualified by the OperationContract attribute are service operations, and can be exposed to clients.


[ServiceContract]
public interface IOrderService {
  [OperationContract]
  void CreateOrder(int orderNumber);
  [OperationContract]
  void AddItemToOrder(int orderNumber, Item itm);
  [OperationContract]
  Order GetOrderDetails(int orderNumber);
}


A WCF service is implemented by creating a class that implements the service interface.


public class OrderService : IOrderService {
  void CreateOrder(int orderNumber) {
    // implementation details
  }
  void AddItemToOrder(int orderNumber, Item itm) {
    // implementation details
  }
  Order GetOrderDetails(int orderNumber) {
    // implementation details
  }
}


Data contracts define how complex types are serialized when they are used in WCF service operations. They defined by applying the DataContract attribute to a class, and then adding DataMember attributes to fields and properties to show which members are to be exposed to clients.


[DataContract]
public class Order {
  [DataMember]
  public int OrderNumber;
  [DataMember]
  public String ClientName;
  ...
}


Message contracts describe the entire SOAP message format. They can use data contracts and serializable types to emit schema for complex types, and they also make it possible to control the SOAP message headers and body explicitly, by using a single type. Message contracts provide a simple method to add custom SOAP headers to incoming and outgoing messages.


[MessageContract]
public class MyRequest {
  [MessageHeader]
  public string field1;
  [MessageBody]
  public string field2;
}


A WCF service reports errors by using Fault objects. Fault contracts document the errors that WCF code is likely to produce, and WCF maps Fault objects to SOAP faults. Note that the type specified in the FaultContract does not have to be an exception.


[OperationContract]
[FaultContract(typeof(DivideByZeroException))]
void SomeMethod();


A Fault is generated by throwing a FaultException:


throw new FaultException(someException);

Thursday, November 09, 2006

Share Common Files in Visual Studio

Under normal circumstances, when you add an existing file to a project, Visual Studio makes a copy of the file, local to the project. This is good for isolating breaking changes, but not so good if you want to share a single copy of a file.

An alternative is to share common files, perhaps containing assembly info or a strong name key, that need to be referenced throughout your code base. To link files across projects by using the Add As Link context menu in the Add Existing Item dialog.

Once added, the linked file can be identified in Solution Explorer by the shortcut symbol at the foot of it's icon. The major benefit is that any changes saved to either the original or any linked file are replicated across the original and all linked files immediately.

Wednesday, November 08, 2006

Create a new GUID in SQL Server

To create a new uniqueidentifier or GUID (Globally Unique Identifier) in SQL Server use the newid() function:

select newid()

This function can be useful for creating test data but there is another use. It's also possible to select a random record using the script below:

select top 1 *
from dbo.Customer
order by newid()


I can't really think of any situation where this randomisation technique would have been helpful but, you never know !

Sunday, November 05, 2006

Command Prompt Previous Command List

This Command Prompt functionality has been around since Windows 2k and it's still available in Vista. I don't believe it's particularly well known and can be useful. Rather than just cycling through previous commands using the cursor keys, a list of the previous commands can be recalled by pressing F7. Select the required command using the cursor keys and hit enter to execute.

Command Prompt Command List

Saturday, November 04, 2006

Avoid releasing ASP.NET applications with <compilation debug="true" /> using <deployment retail=”true”/>

I think most people are aware that running production ASP.NET applications with <compilation debug="true"/> is bad practice for a number of reasons but specifically because compilation takes longer due as batch optimizating is disabled and scripts and images downloaded from the WebResources.axd handler are not cached.

One of the great tricks I learnt at a Scott Guthrie session at TechEd in Sydney earlier this year, was that you can avoid the accidental deployment of applications with <compilation debug="true"/>.

Specifically, by setting the <deployment retail="true"/> switch within your machine.config file, you will disable the <compilation debug="true"/> switch, disable the ability to output trace output in a page, and turn off the ability to show detailed error messages remotely across all ASP.NET applications on the server.

<configuration>
<system.web>
<deployment retail="true/">
</system.web>
</configuration>


It's worth noting that regardless of the increased memory footprint, adding debug symbols to release assemblies can be extremely useful as it allows detailed stack trace and line error messages to be logged when exceptions occur. It's important to note that the generated pdb files must be be deployed with the assemblies for the additional debug information to be available.


To add debug symbols to a Web Deployment Project

  • open the project Property Pages
  • check the Generate debug information checkbox

Web Deployment Project - Generate Debug Symbols

To add debug information to a Web Application Project or Class Library:

  • open the project Property Pages
  • click the Build tab
  • click the Advanced button
  • select pdb-only in the Debug info dropdown
  • click the OK button

Web Application Project - Debug Info

Wednesday, November 01, 2006

Customising Web Deployments with MSBuild

Managing web site build configurations has been dramatically simplified with the introduction of the Web Deployment Project. When a Web Deployment Project is used in conjunction with a web site which of course has no project file, the App_Code directory is easily excluded and a clean build directory results. Web Application Projects on the other hand, have a host of additional files that aren't necessary for deployment and by default, are not removed by the Web Deployment Project. This prompted an investigation of the MSBuild script, automatically generated by the Web Deployment Project UI. Luckily, Wayne Brantley has posted some great tips on customising web deployments with MSBuild.

To view the MSBuild script, right click on the Web Deployment Project in Visual Studio, and select Open Project File.

To remove files and folders not required once deployed, add the elements below to the ItemGroup section.

<ItemGroup>
<!--
Exclude folders
-->
<
ExcludeFromBuild Include="$(SourceWebPhysicalPath)\helpers\**\*.*"
/>
<ExcludeFromBuild Include="$(SourceWebPhysicalPath)\obj\**\*.*" />
<
ExcludeFromBuild Include="$(SourceWebPhysicalPath)\proxies\**\*.*"
/>
<
ExcludeFromBuild Include="$(SourceWebPhysicalPath)\properties\**\*.*"
/>
<!--
Exclude file types
-->
<
ExcludeFromBuild Include="$(SourceWebPhysicalPath)\**\*.csproj"
/>
<
ExcludeFromBuild Include="$(SourceWebPhysicalPath)\**\*.scc"
/>
<
ExcludeFromBuild Include="$(SourceWebPhysicalPath)\**\*.user"
/>
<
ExcludeFromBuild Include="$(SourceWebPhysicalPath)\**\*.vspscc"
/>
</
ItemGroup>

It's also possible to deploy specific files depending on the build configuration. For instance, to replace the web.config file when building in release configuration, create a file named web.config.release and add the elements below to the MSBuild script. This works for any file type in the root directory named *.release, not just config files.

<ItemGroup>
<MySourceConfigFiles Include="$(SourceWebPhysicalPath)\*.$(Configuration)"
/>
<
MyUnNeededDestFiles Include="$(SourceWebPhysicalPath)\*.release"
/>
</
ItemGroup
>
...
...
<Target Name="AfterBuild"
>
<
Copy SourceFiles="@(MySourceConfigFiles)" DestinationFiles="@(MySourceConfigFiles->'$(OutputPath)\%(Filename)')"
/>
<
Delete Files="@(MyUnNeededDestFiles->'$(OutputPath)\%(Filename)%(Extension)')"
/>
</
Target>

Remove time from datetime in SQL Server

This was going to be a one liner but as ever, there's always something new to learn. Whenever I've needed to remove the time portion from a datetime in SQL Server I've generally used this SQL:

select convert(datetime, convert(char, getdate(), 106))


However, I found a faster method where no string conversion is necessary here. The performance improvement is only slight, 10k conversions are 0.21 seconds quicker, but it's interesting nonetheless.

Internally SQL Server stores datetime values as two 4-byte integers. The first one represents the days since 1st Jan. 1900 and the second one the number of milliseconds since midnight. Therefore another solution is to convert the datetime value to float, strip the digits behind the decimal point and convert it back to datetime again:

select cast(floor(cast(getdate() as float)) as datetime)

Captain Sybase ;)

Authentication and Access Control Diagnostics

In my previous post, I talked about an IIS issue when using integrated authentication and a custom service account that does not have a service principal name. The problem took some time to diagnose and solve, and it was only later that the Authentication and Access Control Diagnostics tool came to my attention. I replicated the original issue and ran the tool with some very positive results.

Diagnosis with the Check Authentication task, clearly indicates that the custom identity of the application pool under which the virtual directory is running, does not have a service principle name and Kerberos authentication will fail -

Once Kerberos authentication is disabled, only NTLM is available. Rerunning the Check Authentication task results in the warning below -


I think this is a great tool, and one that will save my team a great deal of time in future.